This tutorial illustrates the usage of JPA with Hibernate as the persistence layer for a Java SE application. For this tutorial we use a PostgreSQL database. The installation of PostgreSQL and creation of the test database is not handled in this tutorial.
Start NetBeans and create a new Java project.
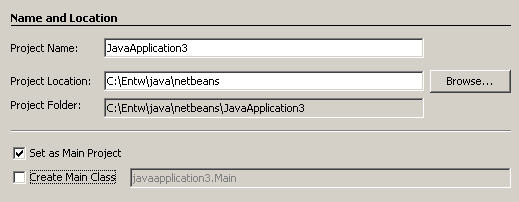
Name your project «JPATutorial» and deselect the «Create Main Class» checkbox. Click on «Finish» and the setup wizard creates your project. Right click the «Source Packages» note in the project explorer and select «New -> Java Package». Name the package «jpatutorial» and click «Finish».
Libraries
We need some additional libraries for our project. First we need the Hibernate Core and Hibernate Entity Manager libraries. You can download this libraries from the Hibernate website. Second, we need the jdbc drivers for our PostgreSQL database system. And last, we need the JPA libraries from the Java EE 5 SDK. You can download this from the Sun website or if you have a installed Sun Java System Application Server, you can simply use the javaee.jar from this installation.
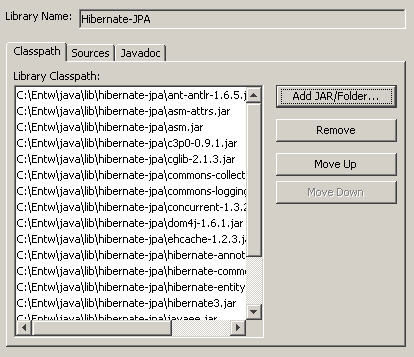
Use the NetBeans Library Manager under «Tools -> Library Manager» to create a new class library. Name the library «Hibernate-JPA» and choose «Class Libraries» as Library type.
Add the following files to the library class path:
from Hibernate Core:
hibernate3.jar
lib/antlr-2.7.6.jar
lib/asm-attrs.jar
lib/asm.jar
lib/c3p0-0.9.1.jar
lib/cglib-2.1.3.jar
lib/commons-collections-2.1.1.jar
lib/commons-logging-1.0.4.jar
lib/concurrent-1.3.2.jar
lib/dom4j-1.6.1.jar
lib/ehcache-1.2.3.jar
lib/javassist.jar
lib/log4j-1.2.11.jar
from Hibernate Entity Manager:
hibernate-entitymanager.jar
lib/hibernate-annotations.jar
lib/hibernate-commons-annotations.jar
lib/jboss-archive-browsing.jar
from Java EE 5 SDK:
javaee.jar
from PostgreSQL JDBC driver:
postgresql-8.2-504.jdbc3.jar
Persistence Unit
Now we create the persistence.xml file, the main configuration file for a JPA application. Right click your project in the project explorer and choose «New -> File/Folder». Select the «Persistence» category and the file type «Persistence Unit». Click next, the wizard asks about the persistence unit name, the persistence library and the database connection. So we want to use Hibernate as our persistence provider and PostgreSQL as database backend, our choices should look like this:
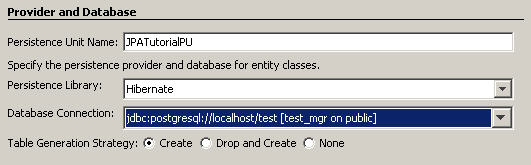
If your database connection is not already defined you can use the «New database connection…» wizard to create it.
Leave the setting «Create» for the table generation scheme. This automatically create needed tables in the database. Use «Drop and Create» if your tables should be deleted and newly created on every program start (good for unit tests). «None» is the preffered setting for production environment and does nothing on program start.
We want to make this a swing application. So right click the package and choose «New -> JFrame Form». Type «MainUI» as class name and click finish. The wizard generates our new swing class and starts the matisse gui builder.
Entity class
JPA uses entity classes to persist information. An entity class is a simple pojo with annotations. You should always implement the Serializable interface, although it’s not needed. Background: In an Java EE environment, entity objects are often transfered between an enterprise java bean and a web application. The enterprise bean lives in the ejb container and the web application in the web container. When objects are transfered between containers, they must be serializable.
Right click your «jpatutorial» package and choose «New -> File/Folder». Select «Entity Class» from the «Persistence» category and click next. Enter Address as class name and click finish.
Place the cursor above the constructor and add the following code:
private String customerNo;
private String lastname;
private String firstname;
private String street;
private String postcode;
private String city;
Right click in the editor window and choose «Refactor -> Encapsulate fields…» to create the getter and setter methods for our properties.
User interface
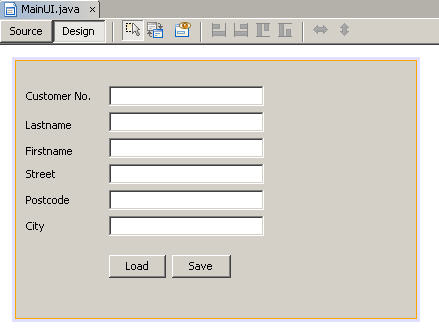
Now we need some gui components for the application. Drag and drop six JLabel and six JTextField components onto the frame.
Name the label components «customerNoLabel», «nameLabel», «firstnameLabel», «streetLabel», «postcodeLabel» and «cityLabel». Set the component text property to a corresponding value.
For the textfield components choose «customerNoText», «nameText», «firstnameText», «streetText», «postcodeText» and «cityText» as component name. Clear the text property of this components.
Drag two JButton components to the page, one named «Load» and the other named «Save». Set the name properties to «loadButton» and «saveButton».
Your frame should look like this:
Store object
Select the Save button, right click and choose «Events -> Action -> actionPerformed». Enter the following code into the event handler:
private void saveButtonActionPerformed(ActionEvent evt) {
  Address address = new Address();
  address.setCustomerNo( customerNoText.getText() );
  address.setLastname( lastnameText.getText() );
  address.setFirstname( firstnameText.getText() );
  address.setStreet( streetText.getText() );
  address.setPostcode( postcodeText.getText() );
  address.setCity( cityText.getText() );

  EntityManagerFactory emf = Persistence.createEntityManagerFactory(
    "JPATutorialPU" );
  EntityManager em = emf.createEntityManager();
  em.getTransaction().begin();

  try {
    em.persist( address );
    em.getTransaction().commit();
  } catch (Exception e) {
    System.out.println( e.getMessage() );
    em.getTransaction().rollback();
  } finally {
    em.close();
  }
}
Right click in your source and select «Fix Imports» (or press ALT-SHIFT-F) to add the needed import statements to your source.
This code creates a Address object and fill it’s properties from our frame. Now we create an EntityManagerFactory for our persistence unit. With this factory we can create the needed EntityManager.
To persist our Address object we use the persist method of the EntityManager.
Retrieve object
Now we want to retrieve an object from the database. Right click the load button and select «Events -> Action -> actionPerformed». Enter the following code into the event handler:
private void loadButtonActionPerformed(java.awt.event.ActionEvent evt) {

  EntityManagerFactory emf = Persistence.createEntityManagerFactory(
    "JPATutorialPU" );
  EntityManager em = emf.createEntityManager();
  em.getTransaction().begin();

  String customerNo = JOptionPane.showInputDialog(
    null,
    "Enter customer number",
    "Input",
    JOptionPane.QUESTION_MESSAGE);

  try {
    Query query = em.createQuery(
      "SELECT a FROM Address a WHERE a.customerNo = :customerNo");
    query.setParameter(
      "customerNo",
      customerNo);

    Address address = (Address) query.getSingleResult();

    customerNoText.setText( address.getCustomerNo() );
    lastnameText.setText( address.getLastname() );
    firstnameText.setText( address.getFirstname() );
    streetText.setText( address.getStreet() );
    postcodeText.setText( address.getPostcode() );
    cityText.setText( address.getCity() );

  } catch (Exception e) {
    System.out.println( e.getMessage() );
    em.getTransaction().rollback();
  } finally {
    em.close();
  }
}
Right click in your source and select «Fix Imports» (or press ALT-SHIFT-F) to add the needed import statements to your source. Select «javax.persistence.Query» as fully qualified Name for the Query class.
This code does the following: It asks the user about the customer number, creates a query object and sets the parameter «customerNo» to the entered value. The method «getSingleResult» of the query object returns the result object or an exception if no result was found.
The source code for this tutorial can be downloaded here.
Hello,
Good fast tutorial on writing a basic entity bean from scratch, but are you really accessing your db from your swing classes? You should at least centralise your db accesses somewhere :-/
Perfect, helped me to configure netbeans+hibernate.
I read all of this tutorial but I couldn’t find the annotations on the entity classes? How is this JPA?
First of all thanks for writing this tutorial.Is there any way to keep the classes handling database seperated from the UI classes. So that the database access was kept centralised and the client developed using swing will access these from other systems.
god resource Continue also