ObjectListDataProvider Tutorial

This is a tutorial for using the ObjectListDataProvider in a Visual Web Project. A ObjectListDataProvider is useful if the underlaying data is from a datasource not supported by NetBeans. Some samples for such datasources are a JPA or hibernate connection, other legacy systems such SAP or Lotus Notes and files in various formats.

In this tutorial we use a text file with customer records as datasource for our application.

Creating the project

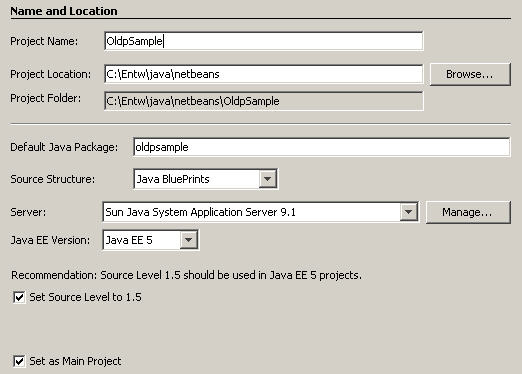
In the first step you create a normal VWP project named OldpSample:

Project settings OLDP

Address POJO

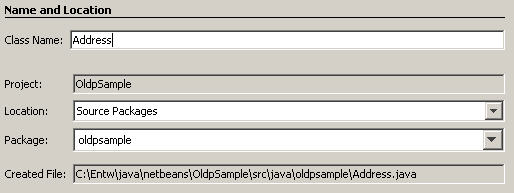
For data storage we use a simple POJO object. Right click the oldpsample package under «Source Packages» and select «New -> Java Class». Name the class Address.

Create Address class

package oldpsample;

public class Address {

  private String id;
  private String title;
  private String lastname;
  private String firstname;
  private String street;
  private String city;
  private String state;
  private String country;

/** Creates a new instance of Address */
  public Address() {
  }

  public String getId() {
    return id;
  }

  public void setId(String id) {
    this.id = id;
  }

  public String getTitle() {
    return title;
  }

  public void setTitle(String title) {
    this.title = title;
  }

  public String getLastname() {
    return lastname;
  }

  public void setLastname(String lastname) {
    this.lastname = lastname;
  }

  public String getFirstname() {
    return firstname;
  }

  public void setFirstname(String firstname) {
    this.firstname = firstname;
  }

  public String getStreet() {
    return street;
  }

  public void setStreet(String street) {
    this.street = street;
  }

  public String getCity() {
    return city;
  }

  public void setCity(String city) {
    this.city = city;
  }

  public String getState() {
    return state;
  }

  public void setState(String state) {
    this.state = state;
  }

  public String getCountry() {
    return country;
  }

  public void setCountry(String country) {
    this.country = country;
  }

}

Create AddressDataProvider

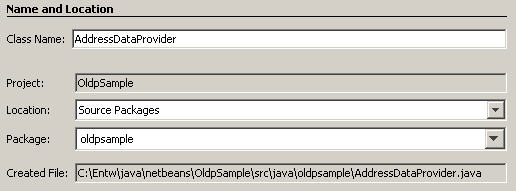
Now we create the class AddressDataProvider. We create a new class and derive it from ObjectListDataProvider. Right click the oldpsample package under «Source Packages» and select «New -> Java Class».

Create AdressDataProvider class

Our class stores all data in a ArrayList, so we need a member variable of type ArrayList. In the constructor we must tell the underlying ObjectListDataProvider where the data comes from (method setList) and of which type the data is (method setObjectType). We also need methods to load the data from file or stream.

package oldpsample;

import com.sun.data.provider.impl.ObjectListDataProvider;
import java.io.BufferedReader;
import java.io.FileInputStream;
import java.io.InputStream;
import java.io.InputStreamReader;
import java.util.ArrayList;

public class AddressDataProvider extends ObjectListDataProvider {

  private ArrayList addressList = new ArrayList();

  /** Creates a new instance of AddressDataProvider */
  public AddressDataProvider() {
    setList( addressList );
    setObjectType( Address.class );
  }

  public void load(InputStream istream ) {
      try {
      InputStreamReader sr = new InputStreamReader( istream );
      BufferedReader br = new BufferedReader( sr );

      while ( br.ready() ) {
        String line = br.readLine();
        String[] cols = line.split( ";" );

        if ( cols.length == 8 ) {
          Address address = new Address();
          address.setId( cols[0] );
          address.setTitle( cols[1] );
          address.setLastname( cols[2] );
          address.setFirstname( cols[3] );
          address.setStreet( cols[4] );
          address.setCity( cols[5] );
          address.setState( cols[6] );
          address.setCountry( cols[7] );
          getList().add( address );
        }
      }

    } catch ( Exception e ) {
      e.printStackTrace();
    }
  }

  public void load(String filename) {
    try {
      FileInputStream fs = new FileInputStream( filename );
      load( fs );
    } catch ( Exception e ) {
      e.printStackTrace();
    }
  }

}

Add AddressDataProvider to SessionBean1

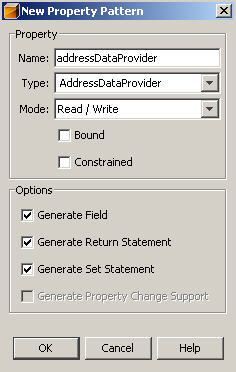
In the outline view right click on SessionBean1 and select «Add->Property» from the context menu. Name the property «addressDataProvider» and enter «AddressDataProvider» as Type. Leave all other options on the default values.

New Property addressDataProvider

Double click SessionBean1 in the outline view. Find the line

private AddressDataProvider addressDataProvider;

and change it to

private AddressDataProvider addressDataProvider = new AddressDataProvider();

You must build, close and reopen your VWP project now (as of NetBeans 5.5.1). If not, NetBeans doesn’t detect our ObjectListDataProvider. This should hopefully not been necessary in future NetBeans releases.

Design Web Page

The project wizard has generated a default web page Page1.jsp. Open this page and the visual designer starts.

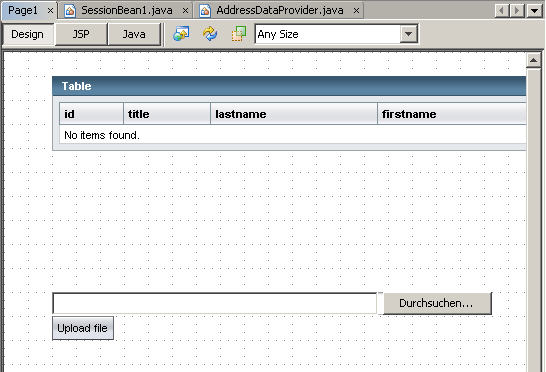
Select a table component from the palette and drop it onto your page. Right click the table component and select «Bind to Data…». Select «addressDataProvider (SessionBean1)» from the dropdown list. Reorder the fields with the «Up» and «Down» buttons, so it look like this:

Select Data Provider

Press «OK» and our page has a table component bound to the AddressDataProvider.

To show some data in the table component we let the user upload a CSV file. Drop a File Upload and a Button component from the palette onto the page. Set the text property of the button to «Upload file». Your page should look like this:

Page Design

Double click on the «Upload file» button and enter the following code into the event handler:

public String button1_action() {
  if ( fileUpload1.getUploadedFile().getSize() > 0 ) {
    try {
      getSessionBean1().getAddressDataProvider().load(
        getFileUpload1().getUploadedFile().getInputStream() );
    } catch ( Exception e ) {
      e.printStackTrace();
    }
  }
  return null;
}

Run your project. Use this sample CSV data file to test the application:

1;Mr.;Able;Tony;216 King St;San Francisco;CA;USA
2;Mr.;Black;Tom;655 Divisadero St;San Francisco;CA;USA
3;Mr.;Kent;Richard;509 Valencia St;San Francisco;CA;USA
4;Mr.;Chen;Larry;407 Ellis St;San Francisco;CA;USA
5;Mrs.;Donaldson;Sue;314 Columbus Ave;San Francisco;CA;USA
6;Mr.;Murrell;Tony;4124 Geary Blvd;San Francisco;CA;USA

This sample project can also be downloaded.

NetBeans JPA and Hibernate Tutorial

This tutorial illustrates the usage of JPA with Hibernate as the persistence layer for a Java SE application. For this tutorial we use a PostgreSQL database. The installation of PostgreSQL and creation of the test database is not handled in this tutorial.

Start NetBeans and create a new Java project.

JPA Tutorial: Screenshot new project wizard

Name your project «JPATutorial» and deselect the «Create Main Class» checkbox. Click on «Finish» and the setup wizard creates your project. Right click the «Source Packages» note in the project explorer and select «New -> Java Package». Name the package «jpatutorial» and click «Finish».

Libraries

We need some additional libraries for our project. First we need the Hibernate Core and Hibernate Entity Manager libraries. You can download this libraries from the Hibernate website. Second, we need the jdbc drivers for our PostgreSQL database system. And last, we need the JPA libraries from the Java EE 5 SDK. You can download this from the Sun website or if you have a installed Sun Java System Application Server, you can simply use the javaee.jar from this installation.

Use the NetBeans Library Manager under «Tools -> Library Manager» to create a new class library. Name the library «Hibernate-JPA» and choose «Class Libraries» as Library type.

Add the following files to the library class path:

from Hibernate Core:
hibernate3.jar
lib/antlr-2.7.6.jar
lib/asm-attrs.jar
lib/asm.jar
lib/c3p0-0.9.1.jar
lib/cglib-2.1.3.jar
lib/commons-collections-2.1.1.jar
lib/commons-logging-1.0.4.jar
lib/concurrent-1.3.2.jar
lib/dom4j-1.6.1.jar
lib/ehcache-1.2.3.jar
lib/javassist.jar
lib/log4j-1.2.11.jar

from Hibernate Entity Manager:
hibernate-entitymanager.jar
lib/hibernate-annotations.jar
lib/hibernate-commons-annotations.jar
lib/jboss-archive-browsing.jar

from Java EE 5 SDK:
javaee.jar

from PostgreSQL JDBC driver:
postgresql-8.2-504.jdbc3.jar

JPA Tutorial: Screenshot library manager

Persistence Unit

Now we create the persistence.xml file, the main configuration file for a JPA application. Right click your project in the project explorer and choose «New -> File/Folder». Select the «Persistence» category and the file type «Persistence Unit». Click next, the wizard asks about the persistence unit name, the persistence library and the database connection. So we want to use Hibernate as our persistence provider and PostgreSQL as database backend, our choices should look like this:

JPA Tutorial: Screenshot persistence unit wizard

If your database connection is not already defined you can use the «New database connection…» wizard to create it.

Leave the setting «Create» for the table generation scheme. This automatically create needed tables in the database. Use «Drop and Create» if your tables should be deleted and newly created on every program start (good for unit tests). «None» is the preffered setting for production environment and does nothing on program start.

We want to make this a swing application. So right click the package and choose «New -> JFrame Form». Type «MainUI» as class name and click finish. The wizard generates our new swing class and starts the matisse gui builder.

Entity class

JPA uses entity classes to persist information. An entity class is a simple pojo with annotations. You should always implement the Serializable interface, although it’s not needed. Background: In an Java EE environment, entity objects are often transfered between an enterprise java bean and a web application. The enterprise bean lives in the ejb container and the web application in the web container. When objects are transfered between containers, they must be serializable.

Right click your «jpatutorial» package and choose «New -> File/Folder». Select «Entity Class» from the «Persistence» category and click next. Enter Address as class name and click finish.

Place the cursor above the constructor and add the following code:

private String customerNo;
private String lastname;
private String firstname;
private String street;
private String postcode;
private String city;

Right click in the editor window and choose «Refactor -> Encapsulate fields…» to create the getter and setter methods for our properties.

User interface

Now we need some gui components for the application. Drag and drop six JLabel and six JTextField components onto the frame.

Name the label components «customerNoLabel», «nameLabel», «firstnameLabel», «streetLabel», «postcodeLabel» and «cityLabel». Set the component text property to a corresponding value.

For the textfield components choose «customerNoText», «nameText», «firstnameText», «streetText», «postcodeText» and «cityText» as component name. Clear the text property of this components.

Drag two JButton components to the page, one named «Load» and the other named «Save». Set the name properties to «loadButton» and «saveButton».

Your frame should look like this:

JPA Tutorial: Screenshot MainUI frame

Store object

Select the Save button, right click and choose «Events -> Action -> actionPerformed». Enter the following code into the event handler:

private void saveButtonActionPerformed(ActionEvent evt) {
  Address address = new Address();
  address.setCustomerNo( customerNoText.getText() );
  address.setLastname( lastnameText.getText() );
  address.setFirstname( firstnameText.getText() );
  address.setStreet( streetText.getText() );
  address.setPostcode( postcodeText.getText() );
  address.setCity( cityText.getText() );

  EntityManagerFactory emf = Persistence.createEntityManagerFactory(
    "JPATutorialPU" );
  EntityManager em = emf.createEntityManager();
  em.getTransaction().begin();

  try {
    em.persist( address );
    em.getTransaction().commit();
  } catch (Exception e) {
    System.out.println( e.getMessage() );
    em.getTransaction().rollback();
  } finally {
    em.close();
  }
}

Right click in your source and select «Fix Imports» (or press ALT-SHIFT-F) to add the needed import statements to your source.

This code creates a Address object and fill it’s properties from our frame. Now we create an EntityManagerFactory for our persistence unit. With this factory we can create the needed EntityManager.

To persist our Address object we use the persist method of the EntityManager.

Retrieve object

Now we want to retrieve an object from the database. Right click the load button and select «Events -> Action -> actionPerformed». Enter the following code into the event handler:

private void loadButtonActionPerformed(java.awt.event.ActionEvent evt) {                                           

  EntityManagerFactory emf = Persistence.createEntityManagerFactory(
    "JPATutorialPU" );
  EntityManager em = emf.createEntityManager();
  em.getTransaction().begin();

  String customerNo = JOptionPane.showInputDialog(
    null,
    "Enter customer number",
    "Input",
    JOptionPane.QUESTION_MESSAGE);

  try {
    Query query = em.createQuery(
      "SELECT a FROM Address a WHERE a.customerNo = :customerNo");
    query.setParameter(
      "customerNo",
      customerNo);

    Address address = (Address) query.getSingleResult();

    customerNoText.setText( address.getCustomerNo() );
    lastnameText.setText( address.getLastname() );
    firstnameText.setText( address.getFirstname() );
    streetText.setText( address.getStreet() );
    postcodeText.setText( address.getPostcode() );
    cityText.setText( address.getCity() );

  } catch (Exception e) {
    System.out.println( e.getMessage() );
    em.getTransaction().rollback();
  } finally {
    em.close();
  }
}

Right click in your source and select «Fix Imports» (or press ALT-SHIFT-F) to add the needed import statements to your source. Select «javax.persistence.Query» as fully qualified Name for the Query class.

This code does the following: It asks the user about the customer number, creates a query object and sets the parameter «customerNo» to the entered value. The method «getSingleResult» of the query object returns the result object or an exception if no result was found.

The source code for this tutorial can be downloaded here.

Fill a treeview programmatically

You must build a collection of TreeNode objects and add this collection to the TreeView control. Each TreeNode object has several properties to set up the visual appearance and functionality.

Important TreeNode properties

expanded - Shows this node expaned with children
ext - Title text of the node
target - Target browser window
toolTip - Tooltip text to display
url - Hyperlink to navigate to
action - Name of method to call if user selects this node
actionListenerExpression - Expression for action listener method.

Adding icon to TreeNode

To add a icon to the TreeNode you must first create a ImageComponent. Now you can set the theme specific icon with the setIcon method. Use a constant of class ThemeImages for the icon name. Add the created ImageComponent as facet to the TreeNode.

Sample:

ImageComponent image = new ImageComponent();
image.setIcon( TreeImages.TREE_FOLDER );
treeNode.getFacets().put( treeNode.IMAGE_FACET_KEY, image );

Setting Action Expression for TreeNode

To set the Action Expression of a TreeNode you must use the method setActionExpression of the TreeNode object. This method needs a MethodExpression object as parameter.

Sample code:

ExpressionFactory ef = FacesContext.
  getCurrentInstance().
  getApplication().
  getExpressionFactory();
ELContext elContext = FacesContext.
  getCurrentInstance().
  getELContext();
MethodExpression me = ef.createMethodExpression(
  elContext,
  "#{Page1.treeNode_action}",
  String.class, new Class[]{} );
treeNode.setActionExpression( me );

ICEFaces installation for NetBeans IDE

ICEFaces is a Java Server Faces component library. To integrate ICEFaces into the NetBeans IDE and the Visual Web Pack the following steps are necessary.

Download of ICEFaces components

The following downloads from the ICEFaces website are needed:

  • ICEfaces-<version>-libs-NetBeans.zip
  • ICEfaces-NetBeans-IDE-<version>.zip
  • ICEfaces-<version>-complib-NetBeans.zip

Installation of ICEFaces runtime library

Unpack the file ICEfaces-<version>-libs-NetBeans.zip and import the included com-icesoft-ide-netbeans-libs-module.nbm module with the NetBeans Update Manager.

Installation of ICEFaces IDE integration

Unpack the file ICEfaces-NetBeans-IDE-<version>.zip and install the module com-icesoft-faces-vwp-ide.nbm. This module must also be installed with the NetBeans Update Manager.

Installation of ICEFaces component library

Unpack file icefaces-webui.complib from ICEfaces-<version>-complib-NetBeans.zip and copy it to your <netbeans-install-dir>/rave2.0/samples folder.

Import the component library with the Component Library Manager under «Tools->Component Library Manager» into your IDE.

Use of ICEFaces components in a Visual Web Pack project

To use the ICEFaces components in a Visual Web Pack application you must add the ICEFaces Component Suite to your project.

Using Jasper Reports with Visual Web Pack

This tutorial illustrates the use of Jasper Reports with a Visual Web Pack application.

Register Jasper Reports library

Use the NetBeans Library Manager to create a library for the Jasper Reports class libraries. You need at least the following files from the distribution:

  • dist/jasperreports-<version>.jar
  • lib/commons-beanutils-1.7.jar
  • lib/commons-collections-2.1.jar
  • lib/commons-digester-1.7.jar
  • lib/commons-logging-1.0.2.jar
  • lib/itext-1.3.1.jar

Register Jasper Reports image servlet

The image servlet is needed if you want html rendered reports (also without any graphical elements, because report placeholders uses images from this servlet). So you must register it in the web.xml configuration file. You can use the NetBeans web.xml editor to do so.

Servlet name  : ImageServlet
Servlet class : net.sf.jasperreports.j2ee.servlets.ImageServlet
URL           : /image

Insert methods for report output to application bean

The following methods in the application bean can be used to output a precompiled report as html or pdf. In this sample a collection of java objects is used as data source. For other data sources see the Jasper Reports documentation.

/**
 * Output Jasper Report
 *
 * @param filename Precompiled report filename
 * @param type Content type of report ("application/pdf" or "text/html")
 * @param data Collection of value objects
 */
public void jasperReport( String filename, String type, Collection data ) {
  jasperReport( filename, type, data, new HashMap() );
}

/**
 * Output Jasper Report
 *
 * @param filename Precompiled report filename
 * @param type Type of report ("application/pdf" or "text/html")
 * @param data Collection of value objects
 * @param params Map with parameters
 */
public void jasperReport( String filename, String type, Collection data, Map params ) {
  final String[] VALID_TYPES = { "text/html", "application/pdf" };
  // First check if type is supported
  boolean found = false;
  for ( int i = 0; i < VALID_TYPES.length; i++ ) {
    if ( VALID_TYPES[i].equals( type ) ) {
      found = true;
      break;
    }
  }

  if ( !found ) {
    throw new IllegalArgumentException( "Report type '" + type + "' not supported." );
  }

  // InputStream for compiled report
  ExternalContext econtext = getExternalContext();
  InputStream stream = econtext.getResourceAsStream( filename );

  if ( stream == null ) {
    throw new IllegalArgumentException( "Report '" + filename + "' could not be opened." );
  }

  // Use collection as data source
  JRBeanCollectionDataSource ds = new JRBeanCollectionDataSource( data );
  JasperPrint jasperPrint = null;

  try {
    jasperPrint = JasperFillManager.fillReport( stream, params, ds );
  } catch ( RuntimeException e ) {
    throw e;
  } catch ( Exception e ) {
    throw new FacesException( e );
  } finally {
    try {
      stream.close();
    } catch ( IOException e ) {
    }
  }

  // Configure exporter and set parameters
  JRExporter exporter = null;
  HttpServletResponse response = (HttpServletResponse) econtext.getResponse();
  FacesContext fcontext = FacesContext.getCurrentInstance();

  try {
    response.setContentType( type );

    if ( "application/pdf".equals( type ) ) {
      exporter = new JRPdfExporter();
      exporter.setParameter( JRExporterParameter.JASPER_PRINT, jasperPrint );
      exporter.setParameter( JRExporterParameter.OUTPUT_STREAM,
        response.getOutputStream() );
    } else if ( "text/html".equals( type ) ) {
      exporter = new JRHtmlExporter();
      exporter.setParameter( JRExporterParameter.JASPER_PRINT, jasperPrint );
      exporter.setParameter( JRExporterParameter.OUTPUT_WRITER, response.getWriter() );
      HttpServletRequest request = (HttpServletRequest)
        fcontext.getExternalContext().getRequest();
      request.getSession().setAttribute(
        ImageServlet.DEFAULT_JASPER_PRINT_SESSION_ATTRIBUTE, jasperPrint );
      exporter.setParameter( JRHtmlExporterParameter.IMAGES_MAP, new HashMap() );
      exporter.setParameter(
        JRHtmlExporterParameter.IMAGES_URI,
        request.getContextPath() + "/image?image=" );
    }
  } catch ( RuntimeException e ) {
    throw e;
  } catch ( Exception e ) {
    throw new FacesException( e );
  }

  // Export report
  try {
    exporter.exportReport();
  } catch ( RuntimeException e ) {
    throw e;
  } catch ( Exception e ) {
    throw new FacesException( e );
  }

  // Tell JavaServer faces that no more processing is necessary
  fcontext.responseComplete();
}

Start report output from page bean

The output of a report can initiated from a ActionEvent with the following code:

try {
  getApplicationBean().jasperReport(
    "/reports/report.jasper",
    "application/pdf",
    getSessionBean().getSuchergebnisDataProvider().getList() );
} catch ( Exception e ) {
  Logger.getLogger(getClass().getName()).severe( e.getMessage() );
}

return null;